Stress-Free Travel Planning, with this 1 Google Docs Template
When I think “Family Travel” the first thing that comes to mind, is a core memory from age 17 of standing in a the middle of a hotel lobby, after a 12-hour flight, jet-lagged, sleep deprived and hungry while my mum tried to find out booking number.
The only thing missing, was being drenched, then it would have been a perfect movie, but fortunately for us, LA in the autumn is pretty dry.
This core member has had a big influence on how I go about travel planning, especially when it comes to family travel. So much so, that I have developed the most simple and easiest temple to take any chaotic family travel plan and turn it into a well-organised timeline of accommodation, activities and transport.
After years of trial and error, I’ve developed the perfect solution to this problem – here is my simple travel planning process, that compiles all your must-haves in one place, transforming chaotic family travel plans into a smooth, stress-free and enjoyable experience.
If you want the best travel planner, but can’t be bothered reading through a long blog post to get it, don’t worry I’ve got you sorted.
You can purchase this Travel Planner template right here and get straight into it: Travel Planner Template
Why Simple is Always Better: The Lawyer’s Approach to Travel Planning
Over the past decade, I’ve planned numerous family adventures, both within New Zealand and abroad.
My legal background combined with that 1 core family-trip experience, has taught me the importance of simplicity but with attention to detail (especially when time = money). Unless you have the luxury of endless travelling, then it’s pretty likely that both your funds and your time will be limited, so let’s help you make the most of both.
Takeaways from This:
By the end of this blog, you should be able to:
- Create a comprehensive travel itinerary that is organised, but flexible
- Feel confident you’re ready for a family trip of a lifetime; and
- Feel relaxed, knowing you don’t have to worry about finding booking numbers or emails in amongst a hundred other details
Thanks to a simple layout, everyone in the family can follow along and better yet understand what the plan is.
So what are you waiting for? Let’s get into it.
Step 1: Setting Up Your Travel Planning Workspace
I’ll walk you through how to build your new, favourite travel planner, in Google Docs but you can create this plan in whatever software/programme you’re comfortable. It will work across Notion, Word and even Excel.
Using Google Docs, this plan won’t cost a thing, and can be shared, printed and stored online hassle free.
Before we get into the travel planning we need to setup our workspace on Google Drive.
This will help keep things organised and easy to find if you need to do this over a few sessions (like me).
Every time you open your Google Drive folders, you will be able to pick up from where you left.
Google Drive Access
Before starting, making sure you have access to Google Drive. If you don’t, sign up to Google here and create one for free.
Create Two Essential Folders
Once you’ve logged into your Google account, head on over to Google Drive. If you use your drive for holding other documents, then you will want to create a folder within your drive to house your plan. If you’re doing this, use the following format for the folder name “Destination – Month.Year” (for example Japan – 09.24).
From here, create two new folders and name them the following
- “All Booking Documents” – This is where you’ll store all your travel-related documents, such as flight confirmations, hotel reservations, and car rental agreements (make sure to save them in PDF format, so they are easy to link and open).
- “Itinerary” – This folder will house your travel itinerary documents.
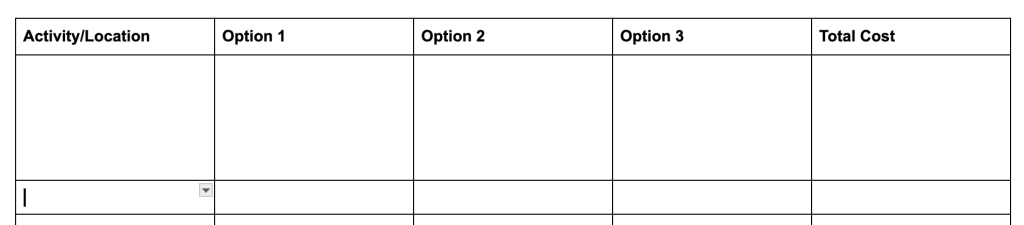
Step 2: Building the Cost Comparison Table to Simplify Travel Planning
Before diving into the itinerary, I find it helpful to create a Cost Comparison Table. This tool allows you to easily compare different travel options and keep track of expenses.
In the “Itinerary” folder:
- Create a new Google Doc, title it “Cost Comparison Table.”
- Within the document insert a table with five columns across and two rows down.
- Label the columns across with the following titles:
- Activity/Location
- Option 1
- Option 2
- Option 3
- Total Cost
A cost comparison table is a great place to keep all your research data – for instance, during our planning for a trip to Japan, we compared various travel routes. Each option had different costs based on stopovers and flight plans. By inputting these details into the table, we were able to select the most cost-effective and convenient option for our family.
Bonus – Group Travel
This table is particularly useful when traveling with a group, as you can include extra columns for different parties’ costs, making it easier to split expenses. Tools like Splitwise are great for managing shared costs, but having a centralised document helps everyone stay on the same page when you’re still in research and planning mode.
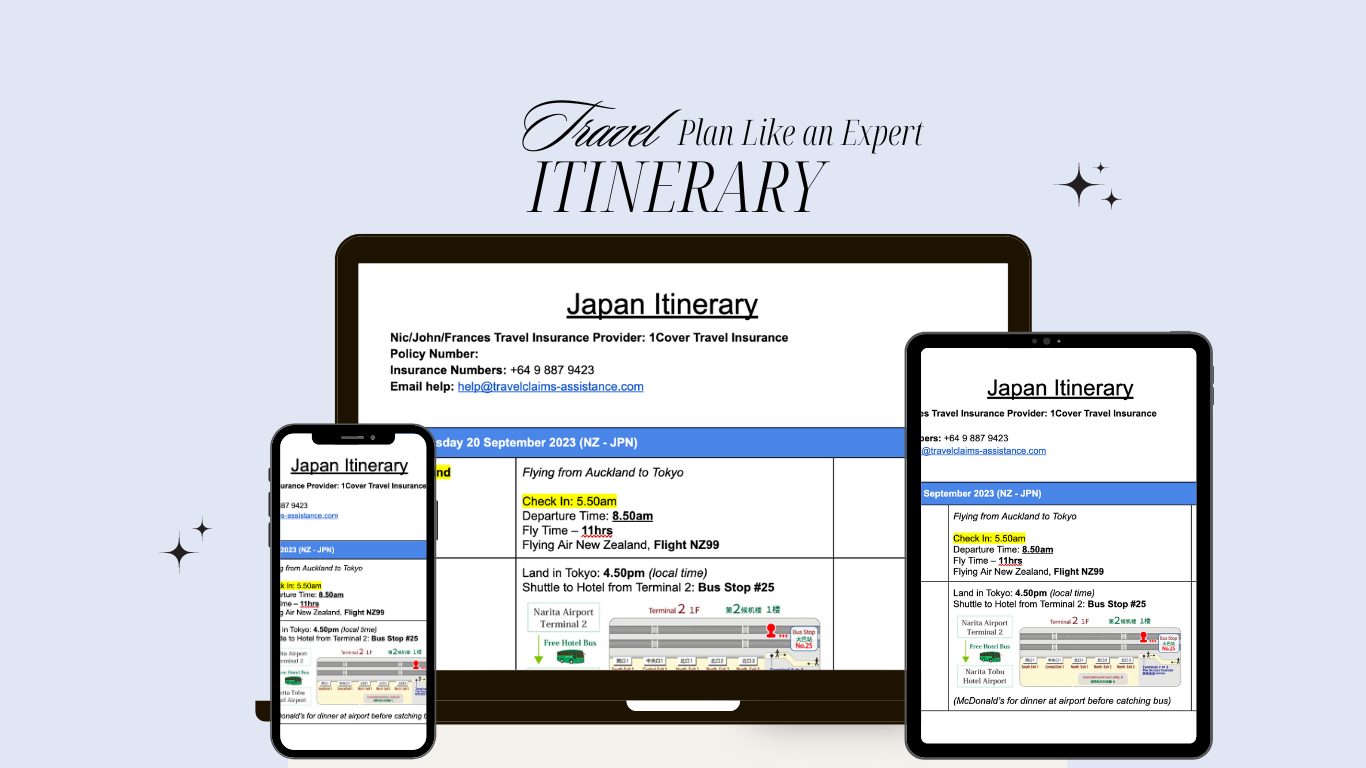
Step 3: Crafting Your Travel Itinerary
With costs sorted, it’s time to build your travel itinerary. This document is the heart of your travel planning process and will be shared with everyone in your party once it’s completed. To begin:
- In the ‘Itinerary’ folder, Create a New Google Doc and title it accordingly, for example, “Japan Travel Plans”
- At the top of the page, centre and increase the text size, inserting the title of the document
- Followed by Essential Information: Include your travel insurance details—policy number, your insurers contact phone number, and their contact email for when you are overseas. This ensures quick access in case of an emergency.
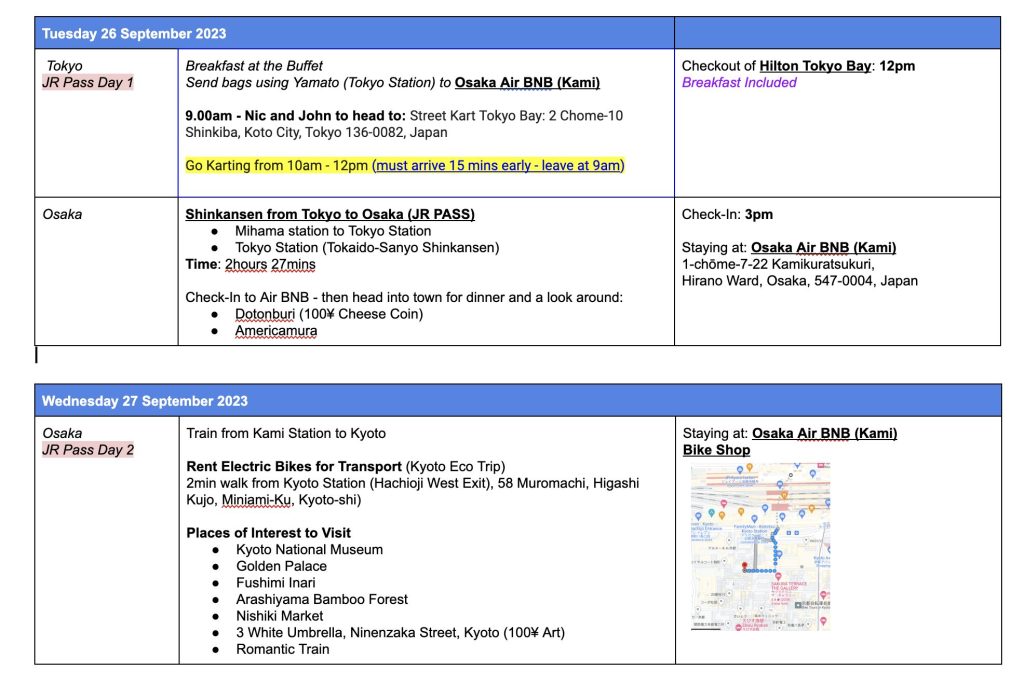
Designing the Itinerary Table
Next, insert a table with three columns across and two rows down. Each of the columns has a purpose, but you won’t give them a title (due to the layout, adding titles makes it a bit messy) – each column will be used for the following:
- Location – In the first column, you will include where you are for the day. If you are travelling from one destination to another, you will add the first destination in one row and the second destination in the following row.
- Activities – The second column is where you will include all information about the activities you will undertake for the day; and
- Accommodation – Finally in the third column is where you will include your accommodation information.
The columns are not titled because the first row of the table is where you’ll input the travel date. As you finish filling in one days activities and details, you’ll create the same layout and put the next date in, in the table. This layout allows everyone to see the daily schedule at a glance, including where you’ll be, what you’ll do, and where you’ll stay. To make the date easy to see and follow, merge the 3 columns across in the first row like below:

For example, our Japan itinerary included flight details from Auckland, accommodation in Tokyo, and planned activities such as visiting temples and exploring local markets. The clear, organised structure made it easy for everyone to know what to expect each day without having to read through all the details.
Linking Important Information
To make your itinerary even more functional, I recommend linking each accommodation to its Google Maps location. This is especially useful in countries like Japan, where Google Maps integrates seamlessly with the local subway system. If you’re traveling to South Korea, consider linking to Naver Maps, which offers detailed subway and shopping information specific to SK.
Here’s how to do it:
- Find Your Accommodation on Google Maps.
- Copy the Link to the location and paste it into your itinerary.
- Include Local Language Details: For non-English speaking countries, add the name and address of your accommodation in the local language (e.g., Japanese or Korean). This can be a lifesaver if you need directions or assistance from locals.
Step 4: Organising and Accessing Booking References
To keep all booking information easily accessible, save your booking documents (PDFs, emails, etc.) in the All Booking Documents folder. You can then link these documents directly within your itinerary for quick reference.
For instance, if you’ve booked a bus from the airport to your hotel, link the PDF with the booking details directly in the itinerary under the relevant activity or travel section. This way, you have all necessary documents at your fingertips, whether you’re online or offline.
Step 5: Sharing the Itinerary with Your Travel Party
Once your itinerary is complete, it’s time to share it with everyone involved. Google Drive makes this process simple and efficient.
- Share the Google Doc: Click “Share” and add the email addresses of those traveling with you. You can choose whether they can view or edit the document.
- Generate a Shareable Link: For those who may not be as tech-savvy, generate a view-only link and email it to them.
- Download and Print: Although most people rely on digital devices, it’s always wise to carry a printed copy of the itinerary. Download the document as a PDF, print it out, and keep it in your luggage. This ensures you’re prepared even if you encounter connectivity issues or a dead battery.
Bonus Tip: Create an Accessible Travel Website
For our last trip to Japan, I took our Google Doc itinerary a step further by turning it into a simple website accessible by everyone in our group. This is an excellent option if you prefer a more visually appealing way to share your plans. If you’re interested in learning how to create a travel website from your itinerary, then checkout my Youtube link here.
Conclusion: Planning Family Adventures Without the Stress
Family holidays don’t have to be a source of stress and chaos. By following this simple and organized planning process, you can ensure that everyone knows what’s happening, when, and where. This method not only saves time and money but also helps create a sense of calm and confidence as you embark on your adventure.
Whether you’re planning a trip to Japan, exploring the wonders of New Zealand, or heading somewhere else entirely, this travel planning system will keep your family on track and excited for the journey ahead. Happy travels!
I hope this blog post provides parents with a comprehensive and accessible guide to stress-free travel planning. By using the outlined method, you can turn a potentially overwhelming process into a manageable and enjoyable experience, ensuring that your family adventures are as memorable as they are organised. Make sure to check out our other blog posts on exciting places to plan your next family adventure here. If you want to share your own journey on how this plan helped you on your next adventure, then email us at nicola@prettyfarfromhome.com
Discover more from Pretty Far from Home
Subscribe to get the latest posts sent to your email.